|


|
|
Note: This page is about controlled resin vacuum infusion. To get
a better understanding about "Vacuum" please have a look at this page called "Understanding
Vacuum". When I lose myself in the various laminating aspects, I find out that there are
some tricky and sticky moments in fabricating the composite parts, concerning:
1. Health.
I prefer to use
Epoxy instead of Polyester or Vinylester resins. Besides of the
smell (styrene), which will cause a nuisance to my family (our garage is the
workshop) and neighbors, epoxy resins
are far superior. I have been working with
epoxy for almost 25 years now and I am
still healthy yet. I want to keep it this way, as developing an epoxy allergy is still one of the
dangers.
Here are some quotes from other builders who
has been less lucky :-( So, a minimal exposure to epoxy is desirable.
2. Quality.
I can have sleepless nights about delaminating of the several layers and the
foam core (I myself having a wooden hart, a metal boat and a prejudgment against
"Tupperware" yachts). The bonding between the reinforcements (fabrics
saturated with epoxy) and the foam core is mechanical and not chemical. I want
to be my ship stiff, also after extensive use. I don't like a boat falling apart
after a heavy weather passage! As for this bonding as for the
reinforcement structure it's very important that there is no capture of air.
Voids in the laminate accelerate delamination and weaken the structure. That's why vacuum 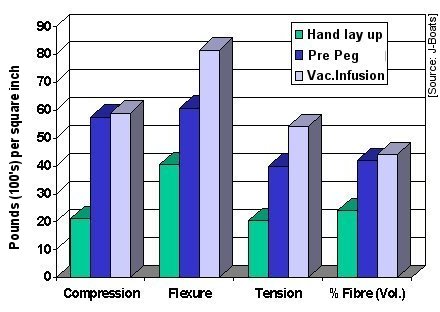 bagging is a preferable technique, for a better laminate,
without voids, dry spots or resin rich spots, a good bonding between the glass layers and the foam core
and a better control of the glass to resin ratio. The process makes the
structure lighter, stiffer and stronger. I don't like secondary bonding
and want to make large and complicated structures in one shot. bagging is a preferable technique, for a better laminate,
without voids, dry spots or resin rich spots, a good bonding between the glass layers and the foam core
and a better control of the glass to resin ratio. The process makes the
structure lighter, stiffer and stronger. I don't like secondary bonding
and want to make large and complicated structures in one shot.
3. Weight.
I aim for an optimum quality, but also an optimum lightweight. I'm not that kind
of racer, well, maybe sometimes, but the lighter the boat the more cruising
stuff you can carry with you (still learning to get out of this bad habit). The
designer has reckoned a safety margin for structural integrity and the builder
have to have confidence in this. But in practice we boat builders tend to built much stronger as needed and it is
often quite
difficult to keep in check with this tendency. Instead of building heavier, I
want to find an extra margin in a save and accurate building method and in the
same time obey to my uncertainty and the (probably unnecessary) need for extra strength
without making concessions to the desired lightweight construction.
 The
Solution: Controlled Vacuum Infusion. The
Solution: Controlled Vacuum Infusion.
VIP = Vacuum Infusion Process, VARTM = Vacuum Assisted Resin Transfer Molding,
RI = Resin Infusion, SCRIMP = Seeman Composites Resin Infusion Molding
Process, CVI - Controlled Vacuum Infusion, all these terms are covering
basically the same technique. The basic idea is simple: lay the
reinforcements materials up dry, compact them under vacuum, and then use the
vacuum to pull the resin in from outside the bag (or mold) which subsequently
progresses through the dry layup.
In the professional building environment this is a promising
technology for the production of large, high-quality, composite parts. This
technique uses one atmosphere of vacuum pressure to drive resin into a laminate. The reinforcement
materials are laid dry and the vacuum is applied before resin is introduced.
Once a complete vacuum is achieved, resin is literally sucked into the laminate
via carefully placed tubing. This
process adds improved worker conditions, emissions reduced to almost nothing and
considerable savings on labor costs. Another big advantage is that you can take
your time for laying out all of the laminations of glass and foam in a dry
environment and not under the pressure of a curing resin. When it is all ready
you can take the time to bag it and check it for leakage. After everything is
fine and checked, infuse it at your leisure, the same day, next week or at any
other moment. The only time you will even need to wear gloves is while mixing
the resin. No rollers, brushes or mess to clean up afterwards. No epoxy
fumes from a large wet area.
 The vacuum infusion process
eliminates the inconsistencies of hand lay-up that's heavily dependent on laminator's
skill and it completely does away with air entrapment and void problems that can
compromise durability. There are no voids that can fill with water or paths for
potential water migration through the core. The process creates the highest
resin-to-glass ratio in yacht construction. This is the result of a 1/3 resin to
2/3 glass fiber ratio rather than the 2/3 resin to 1/3 glass fiber used in other
builder's processes. Higher glass fiber content results in greater strength to
weight ratio and a lighter, yet stronger composite laminate. The vacuum infusion process
eliminates the inconsistencies of hand lay-up that's heavily dependent on laminator's
skill and it completely does away with air entrapment and void problems that can
compromise durability. There are no voids that can fill with water or paths for
potential water migration through the core. The process creates the highest
resin-to-glass ratio in yacht construction. This is the result of a 1/3 resin to
2/3 glass fiber ratio rather than the 2/3 resin to 1/3 glass fiber used in other
builder's processes. Higher glass fiber content results in greater strength to
weight ratio and a lighter, yet stronger composite laminate.
However, in spite of all these advantages,
general acceptance has been slow, mainly due to the high risks involved with
trial-and-error methods due to just guesswork. Without a control method, all
materials and labor are wasted if the chosen injection strategy does not work.
Once infusion begins, there is little that can be done to correct any errors. It
is very easy to destroy a part and the best protection from disaster must be
careful planning. That's why most builders still stick to vacuum bagging,
producing high quality panels, where the excess resin content from the wet
hand-lay-up laminate is sucked by a bleeder under vacuum pressure (up to the breather/bleeder capacity). However, when
larger parts are made, vacuum bagging can become quite elaborate, or even
impossible.
As I've already explained in the FAQ section of this site, I prefer a vacuum
treatment of the laminate. So, how is Resin Infusion comparable to Vacuum
Bagging and hand-lay-up. From my own experience I will try to compare the pro's and
con's:
| |
Quality |
|
Hand lay-up |
|
Vacuum bagging |
|
Resin infusion |
|
| |
|
|
is the traditional wet laminate |
|
uses a sealed
plastic film to apply atmospheric pressure to the traditional wet laminate
in order to
remove some excess resin |
|
uses a sealed
plastic film to achieve a net vacuum on dry fabric in order to draw resin
through that fabric |
|
| |
|
|
|
|
|
|
|
|
| |
|
|
|
|
|
|
|
|
| |
Fiber to resin ratio |
|
-- |
|
+ |
|
++ |
|
| |
|
|
|
|
Instead of a dry laminate, vacuum bagging starts in an oversaturated state
of the laminate. A typical hand lay-up usually results in excess of 100%
fabric weight by resin. Vacuum pressure will remove much of the excess
resin, but the amount removed still depends on a variety of variables. |
|
Better fiber-to-resin ratio. Resin alone is very
brittle, so any excess will actually weaken the part. The reinforcement
materials are still dry, but compressed, when the resin is introduced. Any
excess resin will eventually be sucked out into the vacuum line. As a
result, only the minimum amount of resin is introduced. This lowers
weight, increases strength and maximizes the properties of fiber and
resin. |
|
| |
Heat build up |
|
+ |
|
+ |
|
-/+ |
|
| |
|
|
|
|
No heat build up. Most excess resin is collected in
the bleeder fabric, without an extreme heat build up. |
|
Excess resin is collected in the resin trap. With larger projects one have
to change resin traps to prevent accidents due to
extreme heat build up. |
|
| |
Amount of resin |
|
- |
|
- |
|
++ |
|
| |
|
|
|
|
The human variable is of great influence on resin usage. |
|
Less wasted resin. Due to the nature of vacuum
infusion, resin usage is very consistent and thus very predictable. Waste
can even be zero after some practice.
|
|
| |
Vacuum bag |
|
0 |
|
+ |
|
- |
|
| |
|
|
|
|
Less critical leaks. A leak in the bag will provide a
lower vacuum, but often will not really be fatal to the part. |
|
A leak in the bag can be fatal for the part. |
|
| |
Resin pot-life |
|
- |
|
- |
|
++ |
|
| |
|
|
|
|
The resin pot-life is extremely critical. Depending on when the vacuum
pressure is applied, the amount of resin removed can vary from part to
part. Bagging can quickly turn frantic when a pesky leak in the vacuum
seal cannot be found. |
|
The set up time is unlimited. Because the vacuum is
applied while reinforcements are still dry, there is no resin clock to
work against. After the bag is applied, leaks can be patiently sought out.
If something is not sitting properly, simply release vacuum and readjust.
No time constraints are introduced until it is decided that it is time to
infuse the resin. Until that moment, changes can be made again and again. |
|
| |
Tubing |
|
0 |
|
++ |
|
-- |
|
| |
|
|
|
|
Easy tubing. Vacuum bagging requires the placement of
only the vacuum tubing. |
|
Vacuum infusing requires the placements of vacuum tubing, resin inlets and
in-bag extensions of these tubes. The placements of these tubes are
critical and varies from part to part, depending on size and shape, and
there is no one way to set them up. These considerations must be evaluated
prior to lay-up. |
|
| |
Health |
|
-- |
|
-- |
|
++ |
|
| |
|
|
|
|
Vacuum bagging begins with a hand-lay-up laminate, with all the necessary
equipment and health precautions. The vacuum bag is applied to a wet
surface, with all the accompanying troubles to maintain a clean
environment and to prevent foul vacuum seals. |
|
Cleaner process. Vacuum infusion provides a cleaner,
safer and friendlier work environment. There are no brushes or rollers,
and therefore no splashing, spattering or dripping on yourself. There are
almost none resin fumes to contend with. It is merely mixing the resin and
pour it into a bucket, from whence it is sucked in fully automated fashion
into the laminate. |
|
| |
Quality risks |
|
-/+ |
|
+ |
|
- |
|
| |
|
|
|
|
Straightforward. Vacuum bagging begins with a
hand-lay-up laminate. When something goes wrong, one still can end with
this part, still suitable, however not as good as being vacuum bagged. |
|
Due to the complexity and ease of error in the infusion strategy, it is
very easy to destroy a part Once infusion begins, there is little that can be done to correct
a strategy error. |
|
| |
Quality |
|
- |
|
-/+ |
|
++ |
|
| |
|
|
|
|
The human variable is of great influence. |
|
Constant high quality. However, a correct infusion strategy is
necessary. |
|
| |
Overbleeding |
|
0 |
|
-- |
|
++ |
|
| |
|
|
|
|
Vacuum bagging can lead to overbleeding with a dry laminate as result. |
|
Constant high quality. However, a correct infusion strategy
and the right choice of materialsis
necessary. |
|
| |
Costs |
|
++ |
|
-/+ |
|
- |
|
| |
|
|
|
|
Extra costs for vacuum pump, vacuum bag, sealant tape, tubing, connectors,
release film and bleeder material. |
|
Extra costs for vacuum pump, vacuum bag, sealant tape, tubing,
connectors, release film and resin distribution material. Vacuum pump
must be able to achieve a high vacuum.
|
|
| |
Handling materials |
|
- |
|
-- |
|
++ |
|
| |
|
|
|
|
Not easy. |
|
Easy. All materials are used in a dry and clean
condition.
|
|
| |
Size of job |
|
+ |
|
-- |
|
++ |
|
| |
|
|
|
|
Larger lay-ups are only possible with the help of a lot of extra hands. |
|
Unlimited. Even large lay-ups are possible for a
single-handed builder.
|
|
| |
Mix quality |
|
-- |
|
-- |
|
++ |
|
| |
|
|
|
|
Risk of inaccuracy.
Larger lay-ups requires a lot of small mixing batches. |
|
Accurate. One or more big batches for a
large lay-up improves the quality of the mix and reduces the chance of
mixing errors.
|
|
| |
Multiple layers |
|
- |
|
-/+ |
|
++ |
|
| |
|
|
|
|
The more layers the more awkward |
|
Excellent wetting out, even the exotic
fibers and sometimes the only way to be sure.
|
|
| |
Time |
|
++ |
|
-/+ |
|
+ |
|
| |
|
|
|
|
Extra time is needed for applying vacuum materials and vacuum bag. Once
the hand-lay-up has started, there is no way back and one has to finish
the job.
Wetting-out and squeegee work is time consuming
and not very forgiving and there is additional time involved with
getting the bag and other stuff on while the resin is kicking off,
adding time to an already long and potentially hectic process. |
|
At your leisure. Approximately the same as with vacuum bagging but
because of the absence of the "resin clock" one can divide the job in more
smaller jobs and at a moment that suits best.
A
single person can take as long as they like to drape the fibers, apply
release cloth and flow media, seal the bag, and check for leaks. Having
a much more forgiving timeline one can spread this out over many
evenings after work, and could walk away or be interrupted at any time
without consequence.
|
|
| |
Simultaneous sandwich laminating |
|
-- |
|
-/+ |
|
++ |
|
| |
|
|
|
|
A pity it has to start with hand-lay-up |
|
Try it yourself. Buy
the RI Kit. |
|
I never thought of the possibilities to use this Vacuum Infusion technology by me as a
part time boat builder. But, technologies are developing fast and why should I not
benefit from these advantages. I became
enthusiast when I discovered this
technique while successful used by the building of a one-off 44 ft. leaner.
The key factor in this success, and the reason why I am able to use resin
infusion for building my boat, is the use of a very specialized software
program, RTM-Worx, and the accompanying advice by the developer of this software
Mr. Arjen Korevaar from Polyworx.
The flow simulation software makes it possible to eliminate the guesswork.
Injection strategies that do not work are quickly eliminated and new ways to
infuse parts can be tried out without any risks. It is not necessary to do
costly trials and no labor or materials are wasted with the capability to test
it on the PC first. The simulation code is based on the Finite Element and
Control Volume methods to solve the physical equations that govern flow of a
resin through a porous medium.
When CAD-files are available it is possible to import 3D models from STL, DXF
and PATRAN files. However, the availability can be a problem due to copyright,
license and or confidential aspects. Most designers are uncomfortable supplying
these CAD files - the America's cup guys even get upset if someone looks at
their hull through binoculars. As Mr. Ian Farrier explained to me, it is like
Microsoft gives away the full source code of windows.
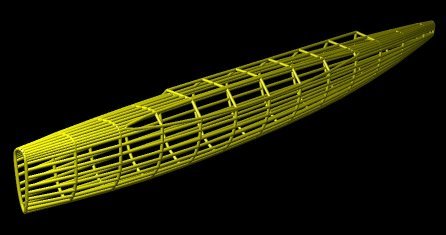
The RTM-Worx software however is also equipped with an integrated geometry
editor. With this function you can enter your own 3D model.
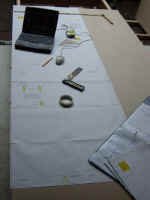 |
It took me four days to
digitalize the Full Size Patterns of the F-39 to an enough accurate 3D model. So
I provide the station lines in the Full Size Patterns with diagonal
lines and thus created a three-dimensional grid. I entered the
corresponding digits in RTM-Worx and joined this key points with curves,
et voila.... |
 |
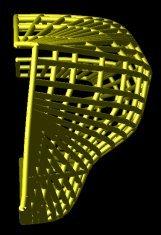
Click one of these 3D models for more views.
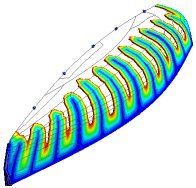
Next step with these models is to add runners, injection and venting ports,
direction of gravity, resin and fabric properties. In the next pictures you can
find the calculated moving animations of the infusion process for the various
hulls and some video's showing the real live infusion of these parts.
Enjoy.
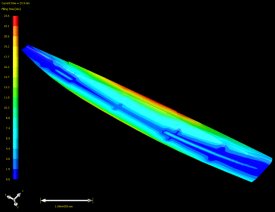
The first infusion experience is with the first float half.
Above image is the
calculated animation, Click on the float image for the moving animation.
I made a video clip of the infusion of the second hull half. On special request
from one of the e-group members on the Multihull Boatbuilders List I've added a
John Williams sound track to catch the accompanying ambiance ;-) |
|
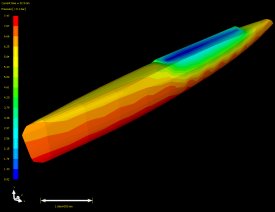 Now the infusion of the outer side of the joined
float is an other story. My goal was to do this in one shot ... and it
happened, a real party, I can assure you. Click on the float to see the computer
simulation. |
|
| The infusion video of the last float half. |
|
| The video of the infusion of the second float, also in one injection shot. |
|
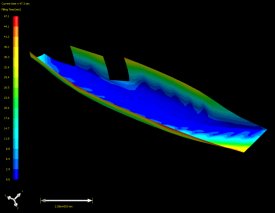
In the above image the animated simulation of the first main hull half.
Video is at the right. |
|
| The video of the infusion of the second mainhull half. |
|
| The video of the infusion of the mainhull bottom |
|
| The video of the infusion of the mainhull deck |
|
| The video of the infusion of the escape hatch |
|
| |
|
| |
|
| |
|
| |
|
| |
|
|
|
| |
|
| |
|
| |
|
|
|
|
| |
|
Do-it-yourself
Vacuum Resin Infusion Starter Kit
The art of infusing various components can seem
daunting at first. It all seems a bit complicated. However, its
difficultly depends solely on the complexity of the part. For
example infusing a flat sheet is simple and relatively straight forward.
I receive a lot of questions about this Resin
Infusion technique, which made me thinking of a way to make this easier
understandable and within practical reach for other builders. When
knowing the principles and understanding of why the resin flows as it flows, it
all will become much easier.
For
infusing simple shapes as panels and bulkheads, you really don't need any
software to do so, just some common sense and a way to overcome all
beginners failures while doing it the right way from the beginning,
without wasting expensive composite materials.
So, here is
the solution to enter the world of Resin Infusion.
Talking about bulkheads and panels several sources are
trying you to believe that vacuum infusion is more work or much slower
than vacuum bagging.
I can assure you it is not!
They also discourage the double layer infusing system, where
both laminates on each side of the foam core are infused simultaneous.
Ridiculous really!
I will learn you how to do this without any risk and with
guaranteed success.
Please try!
Good luck !!
|
|
|
| |
|
|
|
|

|