|


|
|
The construction of the F-39 is a
sandwich of foam and reinforced epoxy. The
reinforcement consists mainly of a stitched glass fabric. In places where great
forces occurs, like in the beams, the glass is replaced by carbon. These modern
materials as carbon and Kevlar makes it also possible to replace the traditional
used materials like aluminum and stainless steel for rigging and hardware by
these modern and stronger substitutions.
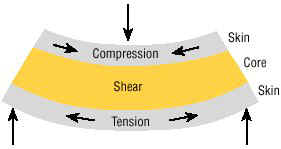 Sandwich
Construction has been well established in boat building for over 30 years. Like
the civil engineer who use I-beams in the construction, the yacht designer
specify the sandwich construction for much the same reason: to increase the
stiffness while at the same time reducing weight. The engineering theory shows
that the flexural stiffness of any panel is proportional to the cube of its
thickness. The laminate skins act as the I-beam flange and the foam core act as
the beam's shear web. Sandwich
Construction has been well established in boat building for over 30 years. Like
the civil engineer who use I-beams in the construction, the yacht designer
specify the sandwich construction for much the same reason: to increase the
stiffness while at the same time reducing weight. The engineering theory shows
that the flexural stiffness of any panel is proportional to the cube of its
thickness. The laminate skins act as the I-beam flange and the foam core act as
the beam's shear web. 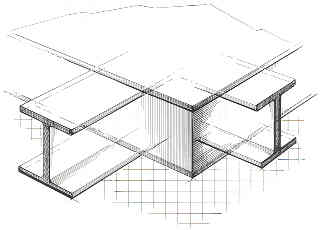 While
the laminate is put into compression or tension, the foam core is put into
shear. It therefore follows that one of the most important properties of the
foam is its shear strength and stiffness. While
the laminate is put into compression or tension, the foam core is put into
shear. It therefore follows that one of the most important properties of the
foam is its shear strength and stiffness.
Core materials are cedar (nature's honeycomb but heavy), end-grain balsa
(water resistance ?), honeycombs (expensive, amateur-friendly ?), foam and
prefabricated combinations of these. Balsa, foam and honeycombs are mostly used
in rigid moulds by professional builders. Cedar and foam makes it possible to
"construct" a hull with simple male or female frames and without the
need of full moulds. With foam I don't mean the well-known foams used for
thermal insulation applications (polyurethane, polystyrene), who are completely
unsuitable for structural applications in a marine environment, but the modified
(cross-linked PVC) or unmodified (linear PVC) structural PVC foam.
Of course the designers preferences and specifications are of vital
importance and the core materials must suit the calculations and worked out
building method.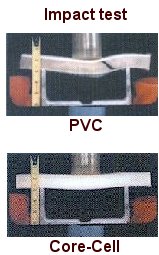
 I choose for
Core-Cell foam from former Canada's ATC-Chemicals
but nowadays SP-Systems, to be the
structural foam.
More than the cross-linked PVC-foam (like Divinycell) but less than the linear
foam (like Airex) this SAN-based foam is more flexible to suit the hull lines
and curves necessary for Farriers vertical foam stripping method. The handling
characteristics are better and thus easier to work with. In fact Core-Cell
combines the best of two worlds, the strength and toughness of the cross-linked
types and the good impact strength and flexibility of the linear types. Impact
tests shows that a sandwich with Core-Cell offers more resistance against impact
forces than cross linked pvc. Core-cell is accepted by Lloyd's Register of Shipping. Another issue is that
with relatively thin skins, PVC foam outgassing has been an issue, which does
not happen with the Core-Cell. Unfortunately, the main disadvantage here in the
Netherlands is the price, about 50% more than the other foams. Another
disadvantage is the combustibility. It burns like hell (Divinycell doesn't). But
the resin isn't any better. The prevention of fire on board will be (as always)
an important safety issue. In fact, as I see it, fire is the one and only danger
whereby this trimaran can sink. I choose for
Core-Cell foam from former Canada's ATC-Chemicals
but nowadays SP-Systems, to be the
structural foam.
More than the cross-linked PVC-foam (like Divinycell) but less than the linear
foam (like Airex) this SAN-based foam is more flexible to suit the hull lines
and curves necessary for Farriers vertical foam stripping method. The handling
characteristics are better and thus easier to work with. In fact Core-Cell
combines the best of two worlds, the strength and toughness of the cross-linked
types and the good impact strength and flexibility of the linear types. Impact
tests shows that a sandwich with Core-Cell offers more resistance against impact
forces than cross linked pvc. Core-cell is accepted by Lloyd's Register of Shipping. Another issue is that
with relatively thin skins, PVC foam outgassing has been an issue, which does
not happen with the Core-Cell. Unfortunately, the main disadvantage here in the
Netherlands is the price, about 50% more than the other foams. Another
disadvantage is the combustibility. It burns like hell (Divinycell doesn't). But
the resin isn't any better. The prevention of fire on board will be (as always)
an important safety issue. In fact, as I see it, fire is the one and only danger
whereby this trimaran can sink.
A500 80 kg/m3 is used for the hulls and
beam bulkheads and A1200 200 kg/m3 is used as
high density inserts for the mounting of hardware.
T400 is used for the interior panels. The core thickness is 15 mm.
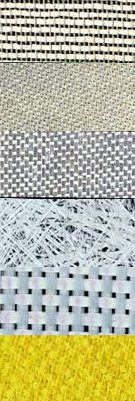
A
fabric is defined as a manufactured assembly of long fibers of glass, carbon,
aramid or a combination of these, to produce a flat sheet of one or more layers
of fibers. Most fabrics in the F-39 are Biaxial 0/90 and 45/45. Where
concentrated forces are to be expected, the fabric is of the Unidirectional
type. The majority of these UD-fibers run in one direction only.
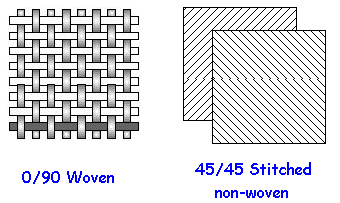 Both
fibers type are non woven. Because of the interla Both
fibers type are non woven. Because of the interla cing
of warp (0°) fibers and weft (90°) fibers the woven fabric will lose a certain
degree of strength due to crimp and the wrinkles and kinks. The fabric I use is
made by a stitching process, which effectively combines two layers of
unidirectional fibers into one fabric. Because of the fibers in these layers are
kept straight and thus eliminating the crimp and shear factors that generally
affect the strength and stiffness values of a standard woven fabric, there is a
significant increase in mechanical performance. Another advantage of this type
of fabric is the higher glass/epoxy ratio by the increase packing of the fiber
which reduces the quantity of resin required. These knitted cloths have just
less interstitial space for the resin. cing
of warp (0°) fibers and weft (90°) fibers the woven fabric will lose a certain
degree of strength due to crimp and the wrinkles and kinks. The fabric I use is
made by a stitching process, which effectively combines two layers of
unidirectional fibers into one fabric. Because of the fibers in these layers are
kept straight and thus eliminating the crimp and shear factors that generally
affect the strength and stiffness values of a standard woven fabric, there is a
significant increase in mechanical performance. Another advantage of this type
of fabric is the higher glass/epoxy ratio by the increase packing of the fiber
which reduces the quantity of resin required. These knitted cloths have just
less interstitial space for the resin.
 Polyester or Vinylester are suitable resins and relative cheap.
In fact, the design is engineered with polyester in mind. But epoxy
resins have far more better mechanical and physical properties and is much more
forgiving. The balance of
properties epoxy can offer is hard to match. Higher compressive properties
combined with higher toughness, higher adhesion with lower shrinkage,
outstanding fatigue performance, low moisture absorption and (by virtue of their
different curing chemistries) a complete absence of potential to suffer osmotic
blistering. Last but no least, epoxy doesn't have the nasty styreen smell. So the choice
between epoxy or polyester/vinylester for the "high-tech" F-39 is no question for me. The
difficult part here is to choose the brand. There is quite a price difference
between known brand names and unknown names but what is the difference? For my
skills and the building method, specially the vacuum technique, the epoxy system
must be flexible according to the curing schedule. There must be enough (gel)
time for doing the job. Health and safety is another important issue (with epoxy
even more than polyester). I finally
decided for Bakelite AG, a German company and the trailblazer in production of
epoxy resins. This decision was also made because of the knowledge in the field
of resin infusion and the technical support I can get from the supplier. For
easier mixing I made a Resin
Chart. An article very well worth reading about epoxy vs. ester resins is on
Kurt Hughes website, follow
this link. Polyester or Vinylester are suitable resins and relative cheap.
In fact, the design is engineered with polyester in mind. But epoxy
resins have far more better mechanical and physical properties and is much more
forgiving. The balance of
properties epoxy can offer is hard to match. Higher compressive properties
combined with higher toughness, higher adhesion with lower shrinkage,
outstanding fatigue performance, low moisture absorption and (by virtue of their
different curing chemistries) a complete absence of potential to suffer osmotic
blistering. Last but no least, epoxy doesn't have the nasty styreen smell. So the choice
between epoxy or polyester/vinylester for the "high-tech" F-39 is no question for me. The
difficult part here is to choose the brand. There is quite a price difference
between known brand names and unknown names but what is the difference? For my
skills and the building method, specially the vacuum technique, the epoxy system
must be flexible according to the curing schedule. There must be enough (gel)
time for doing the job. Health and safety is another important issue (with epoxy
even more than polyester). I finally
decided for Bakelite AG, a German company and the trailblazer in production of
epoxy resins. This decision was also made because of the knowledge in the field
of resin infusion and the technical support I can get from the supplier. For
easier mixing I made a Resin
Chart. An article very well worth reading about epoxy vs. ester resins is on
Kurt Hughes website, follow
this link.
 I
would never undertake such a huge project without the super detailed building
plans of world class designer Ian Farrier. Every part of construction is very
well worked out in detail. Just
follow the indications exact as composite building is something you do (still)
without any feelings in respect of strengths. Working with wood or steel give
you direct indications of strength and stiffness. Composite building is much
different. Create the best working conditions, follow the recipe, wait for the
hardening and trust the result. In my professional job we do it with sand,
gravel, steel, cement and water (reinforced concrete). For this project it
is foam, fabrics and epoxy. It is the designers recipe that guarantees the
strength and stiffness. A lightweight and strong result is the most important
thing so one has to ignore one's natural pressure (as most amateur-builders
have) to make things stronger and heavier. Throughout the building process a
checklist instruction system is used that keeps the work in order and ensures
each job is done correctly and in the most efficient way. I
would never undertake such a huge project without the super detailed building
plans of world class designer Ian Farrier. Every part of construction is very
well worked out in detail. Just
follow the indications exact as composite building is something you do (still)
without any feelings in respect of strengths. Working with wood or steel give
you direct indications of strength and stiffness. Composite building is much
different. Create the best working conditions, follow the recipe, wait for the
hardening and trust the result. In my professional job we do it with sand,
gravel, steel, cement and water (reinforced concrete). For this project it
is foam, fabrics and epoxy. It is the designers recipe that guarantees the
strength and stiffness. A lightweight and strong result is the most important
thing so one has to ignore one's natural pressure (as most amateur-builders
have) to make things stronger and heavier. Throughout the building process a
checklist instruction system is used that keeps the work in order and ensures
each job is done correctly and in the most efficient way.
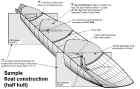
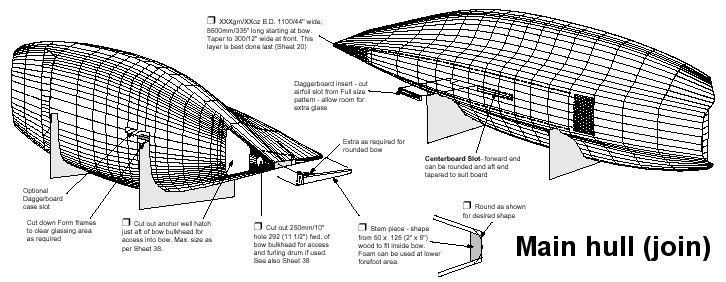
The key factor in Farriers building method is building half hulls, who are
later joined at the centerline. The center hull, the cabin sides, roof and most
of the deck can be combined and all made at the same time. Many of the interior
panels can be added before the hull is joined. An overlap join is required down
the center, but this is exactly the place where any extra glass-reinforcement
should be, for stiffness, and abrasion resistance. This method is much more
easier and faster than the traditional hull-with-deck joining.
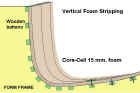
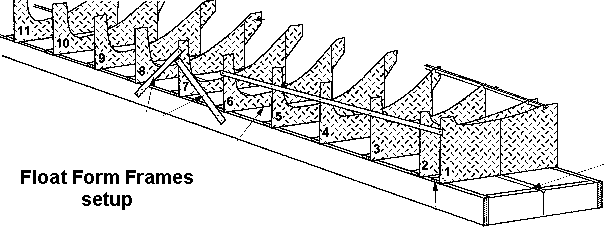 The
construction process starts with the set up of the temporary female form frames
(18mm. MDF). The cutting of the hull line is made larger by the thickness of the
fore and aft battens. The frames are spaced by 635 mm. The fore and aft battens
are spaced every 150 mm. or so, even closer in tighter corners. This wooden
carcass, being a female mould, is planked with 100 to 500 mm. wide foam strips
with joins at right angles to the battens. Self tapping screws, screwed from the
outside, hold the foam down and to the battens. The joins are glued with
thickened epoxy. Once glue has set, there is a half foam hull, ready to receive
the inner glass laminate. The
construction process starts with the set up of the temporary female form frames
(18mm. MDF). The cutting of the hull line is made larger by the thickness of the
fore and aft battens. The frames are spaced by 635 mm. The fore and aft battens
are spaced every 150 mm. or so, even closer in tighter corners. This wooden
carcass, being a female mould, is planked with 100 to 500 mm. wide foam strips
with joins at right angles to the battens. Self tapping screws, screwed from the
outside, hold the foam down and to the battens. The joins are glued with
thickened epoxy. Once glue has set, there is a half foam hull, ready to receive
the inner glass laminate.
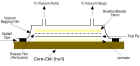
Laminating is almost the same as wallpaper. At least, it is the same mess!
All layers and extra reinforcements are laid in the same laminating process, wet
in wet (wet-out and lay-up method). The last one layer is peel ply, a nylon
release fabric, to which the epoxy resin will not adhere. It shows proper wet
out and improves the surface finish by filling the weave and holding the glass
flatter and it reduces the
need for sanding. Once the resin has cured, the peel ply can be pulled off to
remove amine blush and expose fresh, uncontaminated resin surface that will require little if any sanding. Sanding the
bare epoxy is a tricky business. It is very hard and unfriendly for yourself and
for the sanding paper. But worse is the fact that sanding can damage the glass
fabric. So, peel ply is the way to go and I use it on everything that I glass.
The resin is poured and spread over the glass fabric and excess resin
as well as air bubbles are removed with a squeegee. When the laminate is getting
clear the fabric is satisfied. White spots are to dry and need to be wetted
again. This hand-lay-up method is in principle sufficient when done right.
However, layers are very thin and so there is little margin. Hand laid
glass/foam boats often have bonding problems between the core and skin, as air
is trapped in the open cells on the face of the core. That's not what I want!
 Well
let's face it, building this trimaran is a lot closer to building an
aircraft than it is to traditional boatbuilding. So, one step further in
achieving an absolute premium quality regarding to lightness, durability and strength is
"vacuum bagging". The laminate is wrapped in a plastic bag while a vacuum pump
creates a vacuum in the bag. In this way all trapped air bubbles are soaked up
and the whole laminate is under pressure for an better bonding with the
foam surface without trapped air in the bonding area. A breather fabric allows the air to escape from all over the
completed part and absorbs excess resin. The difficult part here is to airtight
the bag without (to much) leakage. This vacuum bagging is an aerospace
technique from origin, but is relatively simple to do once the principles are
understood. Well
let's face it, building this trimaran is a lot closer to building an
aircraft than it is to traditional boatbuilding. So, one step further in
achieving an absolute premium quality regarding to lightness, durability and strength is
"vacuum bagging". The laminate is wrapped in a plastic bag while a vacuum pump
creates a vacuum in the bag. In this way all trapped air bubbles are soaked up
and the whole laminate is under pressure for an better bonding with the
foam surface without trapped air in the bonding area. A breather fabric allows the air to escape from all over the
completed part and absorbs excess resin. The difficult part here is to airtight
the bag without (to much) leakage. This vacuum bagging is an aerospace
technique from origin, but is relatively simple to do once the principles are
understood.
So, while in the process of preparing my skills, I decided that vacuum
bagging is the way to go. The next problem is the fact that I am working on my
own in a rather small workshop. Vacuum bagging requires a lot of helping hands
as one is working against the resin clock. It also requires preparation in
cutting the fabrics, mark and store them in a way they are immediately usable
for the job. There had to be a better way, .............. and there is. I found the solution in Vacuum Resin Infusing, a real big step
forwards and the most ultimate laminating method within my range.
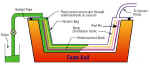 The above schedule is almost the same, except that the bleeder fabric
is replaced by a distribution fabric. The vacuum pressure is now used to drive
the resin into the dry laminate instead. With this technique there is no messy
hand-lay-up anymore. All fabrics are dry placed and after sealing the bag
injected with epoxy, with the vacuum as the driving force. The progress of
the resin through the layup can be monitored visually, and when complete, the
inlets are clamped-off. With this technique I can proceed piecemal with the
layup, working alone in a spare hour here or there, putting the vacuum assembly
together at a leisurely rate, and only when ready pulling a vacuum on the hull
(or part), mixing the resin, and infusing. Because the laminate is compressed
prior to introducing epoxy, a more optimal ratio of resin to fabrics is
obtained. The above schedule is almost the same, except that the bleeder fabric
is replaced by a distribution fabric. The vacuum pressure is now used to drive
the resin into the dry laminate instead. With this technique there is no messy
hand-lay-up anymore. All fabrics are dry placed and after sealing the bag
injected with epoxy, with the vacuum as the driving force. The progress of
the resin through the layup can be monitored visually, and when complete, the
inlets are clamped-off. With this technique I can proceed piecemal with the
layup, working alone in a spare hour here or there, putting the vacuum assembly
together at a leisurely rate, and only when ready pulling a vacuum on the hull
(or part), mixing the resin, and infusing. Because the laminate is compressed
prior to introducing epoxy, a more optimal ratio of resin to fabrics is
obtained.
 And, not the least advantage, human exposure to potentially harmful
epoxy vapors is minimized by reducing the time one actually works with the epoxy
and the difficulty of what one has to do with it. It is merely mixing the epoxy
and pour it into a bucket, from whence it is sucked in fully automated fashion
into the laminate. Most important for me is a
reassurance
that this technique provides a very high quality, both structurally and
cosmetically, and that this is not dependent anymore on the human variable (my skill). Once
the process has been designed, quality will be consistent. And, not the least advantage, human exposure to potentially harmful
epoxy vapors is minimized by reducing the time one actually works with the epoxy
and the difficulty of what one has to do with it. It is merely mixing the epoxy
and pour it into a bucket, from whence it is sucked in fully automated fashion
into the laminate. Most important for me is a
reassurance
that this technique provides a very high quality, both structurally and
cosmetically, and that this is not dependent anymore on the human variable (my skill). Once
the process has been designed, quality will be consistent.
Interior panels and bulkheads are also made with vacuum infusing. Here I use
the double layer infusing system, where both laminates on each side of the foam
core are infused simultaneously. For this purpose I made a flat table, covered
with Formica to be perfectly flat. To allow air and resin to escape from
the bottom layer, the foam core has perforations every 25 mm. Here
you can read more about Controlled Vacuum Infusion, with which I am building all the hulls
and other parts.
Once internal glassing (with stringers included) is complete, all internal
stiffeners and
bulkheads are applied. The bulkheads sit on a wet resin putty filled bed and are
then glass taped to the hull, wet in wet for good bonding and without the ugly
sanding. The hull is then removed from the mould and turn over to laminate the
outer skin. The procedure is the same as with the internal glassing. For the
second hull half the form frames are reversed and the same operation starts
again. After finishing the hull halves are joined together with epoxy glue and
glass tape inside the center line. Outside is done during the infusing of the
outside laminate. Controlled Vacuum Infusion
made it possible to do the outside glassing of the floats in one shot!
What follows is the building of all other structures, the interior, the
beams, the daggerboard, the rudder, hardware, engine etc. and by far the worst
job: fairing-sanding-painting.
Don't dream your life,... Live your
dream.

|

