|
 I guess a 25% of all plans describes the construction of the beams, what looks
to be very intimidating at first sight. I seriously played with the option of
outsourcing the build of them. And who better than Ian Farrier himself is the
best party for the work. The offer was very reasonable, however, our personal
circumstances has changed due to the move to a new house. Our old house is still
unsold so we have to be a little careful with the cash. In near future I also
have to buy the engine and other costly hardware. So, with this in mind I
decided to build the beams by myself, as was the original plan. I guess a 25% of all plans describes the construction of the beams, what looks
to be very intimidating at first sight. I seriously played with the option of
outsourcing the build of them. And who better than Ian Farrier himself is the
best party for the work. The offer was very reasonable, however, our personal
circumstances has changed due to the move to a new house. Our old house is still
unsold so we have to be a little careful with the cash. In near future I also
have to buy the engine and other costly hardware. So, with this in mind I
decided to build the beams by myself, as was the original plan.
At an early stage, I got the
beam mold of a fellow boat builder who moved to Australia. It was sitting in my
garage with the goal to take up the construction during the winter months.
Several times I cleaned up the garage to make room for the build but just as
often it became a mess again, delaying the start of the build once again.
Somehow I look very much against it.
Years went by but finally in the spring of 2017 I took up the challenge to start
the build of the beams.
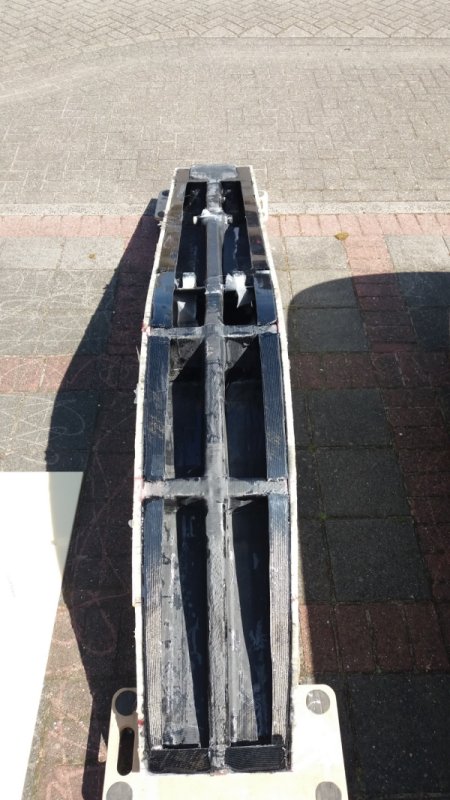
Beam
interior: First things I need for the interior of the beams are the lower folding strut beam anchors and the upper folding strut recess molding. The beam anchors are being made in the same way as the hull anchors. Making the upper folding strut recess moldings is not difficult but the end result still had an unpleasant surprise for me. While assembling the recess molding in the beam mold it appears that the sliding bearing was not perpendicular with the beam mold. While this is a disappointment it turns out not to be a drama, just some extra work due to cutting it out and mounting it again. His time with the help of the beam mold, the upper folding strut beam pivot pin and the lower folding strut.
The standard F39 beams are made of a combination of glassfibre and carbonfibre, the latter for the unidirectional reinforcements in the top and bottom of the beams. However, I have chosen to make the beams full carbon with the main reason of saving weight. I did the lamination of the interior beam for beam in my garage at home. In order to take full advantage of gravity, I arranged the laminate as much as possible in a horizontal plane by turning the mold in the desired direction. (which was heavy at the end)
When ready I moved the beams to the workshop to do the laminate at the outside of the beams.
Please click the images to see the extended photo gallery.
 Beam
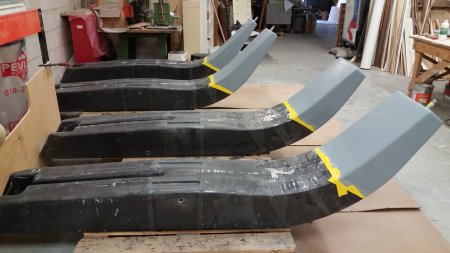
exterior: The laminate on the outside of the beams proved to be a logistic challenge to put the many patches in equally different sizes in the right place. The top and sides of the beam are relatively straightforward but the bottom is another story. I have chosen to leave the lower folding strut molds in place as long as possible but at the same time they form an awkward obstruction. Also the beambolt recess and the upper folding strut recess are time consuming parts to do well. Beam
exterior: The laminate on the outside of the beams proved to be a logistic challenge to put the many patches in equally different sizes in the right place. The top and sides of the beam are relatively straightforward but the bottom is another story. I have chosen to leave the lower folding strut molds in place as long as possible but at the same time they form an awkward obstruction. Also the beambolt recess and the upper folding strut recess are time consuming parts to do well.
All the time I was a bit worried about the releasing of the lower folding strut molds.I made them out of three layers of plywood with packaging tape as a release surface. To avoid all risks on a not releasable mold I sprayed the plastic tape with an extra coating of McLube Sailkote.
The worries proved to be premature. I screwed in two tapped threads and with the help of a few wooden blocks I was able to pull out the molds very smoothly.
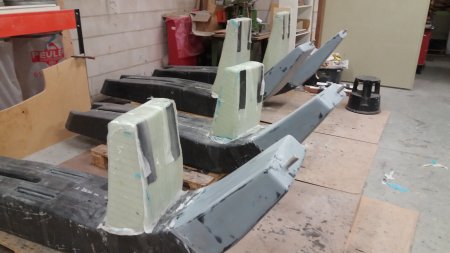 Beam
sleeves: My worries are certainly not over, but releasing these molds gives
me confidence in the next job, making the beam sleeves. Not that this is very
difficult, I made them with vacuum bagging, but releasing them from the beam
outer end is another story. I was warned by the experience of other builders who
had great difficulties with releasing the sleeves. This helps me alot executing
a well proven releasing procedure to lever off the beam bolt. So I made some
wooden beams and placed them over the beam bolt nut with a big washer in
between. I prepared the beam outer ends with 5 layers of a mold release wax. I
have used this stuff before and had not great difficulties with it ...... Beam
sleeves: My worries are certainly not over, but releasing these molds gives
me confidence in the next job, making the beam sleeves. Not that this is very
difficult, I made them with vacuum bagging, but releasing them from the beam
outer end is another story. I was warned by the experience of other builders who
had great difficulties with releasing the sleeves. This helps me alot executing
a well proven releasing procedure to lever off the beam bolt. So I made some
wooden beams and placed them over the beam bolt nut with a big washer in
between. I prepared the beam outer ends with 5 layers of a mold release wax. I
have used this stuff before and had not great difficulties with it ......
However, somewhere in this process or in my thinking I made a big mistake and my
worst nightmare has become true. The sleeves did not want to loosen. Even with a
very brute force they are not prepared to separate from the beam. Of course
there is always a plan B, but damn, this feels like a loss. I ended up with
making a cut in the underside of the sleeve giving space for some wedges. All
four sleeves were more or less glued to the beam at the same spot, the edge
between underside and outer end. Coincidence ? or has anyone a smart conclusion
...
In retrospect, the preparation with the mold release wax was not good enough.
Did I forget this edge ? did I forget it five times ! (I'm not surprised at
anything) or should I have used a PVA release agent in addition to the wax. Or
using packaging tape in addition to the other mold release stuff which gives
then two chances as the tape itself is also able to release. I don't know.
What I do know is that the
approach of the four beams at the same time did not prove very clever for such a
delicate work. There is no way to adjust the technique and make
improvements in the meantime.
What I do know now is that plan B is not a big deal and is a good solution for
quick builders. Thus not worth a nightmare ;)
(to be continued)
|

